Tuesday, May 11, 2010
Thanks 'Bro
My bother was asking about what I had planed on using for the high AMP DC wiring; when I mentioned 0/2 wielding cable. He said while that would be good, what I should really use is this cable they have at the studio. "It's totally better."
So much the slacker
What's in the bucket? Not a list. The business end of a manual transmission more like it.
I like to follow the 914ev group on Google; and try to head problem off at the pass. One of the common problem with the 914 conversion is the RPM's. Mainly how many there are. The 30 year old 901 transmission just isn't up to +5,000 RPM. And they tend to develop a rather sever oscillation at the higher RPM's. So this led me to conclude I needed to rebuild the transmission.
I'm still not sure about replacing the flywheel with a lighter racing version, but we'll see.
Sunday, December 13, 2009
Motor facelift
I got the new part from Azure Dynamics; and a friend came by so I gave the AC 55 a face lift.
As always when dealing with a +200lbs motor, the first thing you want to do is put in on wheels. Next we removed the four long bolts; then applied a hammer to break the poly seal. Once that gave, the front pulled straight off. I was worried the bearing might have found a permanent home in the old face plate. But everything was in great shape.
Motor Porn.
Old is green, new is red.
I then applied some poly caulk around the seam of the new face plate and bolted it home.
Looking fierce.
I'm happy to report the motor spins like a dream. Had I known it was going to go so smoothly I would have spray painted the motor black; I figured I'd be opening and closing the motor 4 or 5 times before everything lined up. Maybe I'll give it a little touch up.
Anyone need an old face plate from an AC55 motor? It's only 25lbs...
Monday, November 16, 2009
AC55 Solution!
Woot-Woot! Turns out what I need is NEMA C-Face kit for a AC55!
Who knew? Turns out Beth at Azure Dynamics does, and will sell me one. So though I'm not a big fan of cracking the motor open (they're sealed), I am a huge fan of this solution!
Who knew? Turns out Beth at Azure Dynamics does, and will sell me one. So though I'm not a big fan of cracking the motor open (they're sealed), I am a huge fan of this solution!So the only remaining mounting question is the forward mounting bracket. I was measuring this weekend; and it's very close to being spot on.
Tuesday, November 10, 2009
Big toys!
Got my big old motor. I was thinking that maybe this motor is just too big for the car; but then I reminded myself that it is a Porsche after all. And isn't putting a giant motor into a tiny car what Porsche is all about?
Well as you can see it is an AC 55 motor.
Now here is what the front should look like (this is from Ross's Electro Jeep blog).
This is what mine look like. Not quite sure how I'll mount the clutch plate and transmission to it. I'm thinking of making some type of adapter ring.
Sorry about the horrible quality of that last shot. It's showing 2" (trust me).
Monday, October 26, 2009
Going to see the Mona Lisa
For very different reasons, I found myself up Santa Monica way this weekend. So I availed myself with a trip to THE STORE.
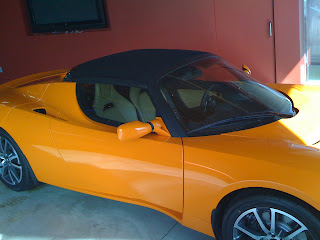
Of course I'm talking about the Tesla store. It was very nice, the had a couple of the cars arranged around the place, letting you see all the aspects of the car.
It was a very nice ride indeed. VERY low to the ground. I used to have a sports coupe, and this was even lower than that. It has a surprising tall front. I assume from the Lotus carriage. I would have rather had the seats a little higher. But that's just me.

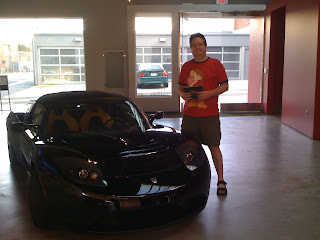
Speaking of which; there is me. I wanted a picture for scale. It's a very sporty car. And really designed with that one thing in mind. One note of my own (for what it's worth) I've been a Lotus fan for sometime, and have had the opportunity to ride it a couple of them. Tesla really should have worked more on branding this car as unique; unless they don't mind the Lotus comparison.
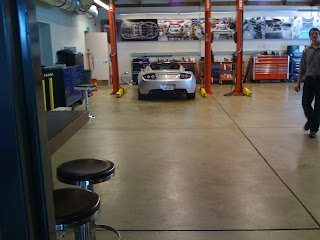
Here's the repair center (right off the sales floor) For when your car breaks. Like a tire gets low on air pressure or such.

Having seen what you can do to make a purely electric car as a finished piece of art, I've got a couple of ideas on things I want to be be able to add to mine.
Just slowed down
I'm still working on the car, just real slowly. I'm often asked how long it will take, and my answer is always the same: "The more money I spend; that faster it will go."
Well I'm spending very little currently.
But I am purchasing things. I have two large purchases coming soon. I'll post on then when they arrive, so as to build suspense.
Thursday, April 16, 2009
Looking car shaped.
Life got out of the way for a few minutes over the last couple of days; and I've been able to spend some time working on the car. So it's starting to look vaguely car shaped.
Except the price.
Friday, October 10, 2008
Bling in the rear.
Got more work done. The other day we got home from a family outing a little earlier then planed, so I was able to work out in the garage. So I finished up the rear trunk.
The only thing I have left to do on the electrical is the console displays. But most of that is ironically mechanical hook ups. What I'm contemplating (read procrastinating) is going ahead and using white LEDS. I will put them in eventually, so why not do it now.
In my best Arnold: "Due it, DUE IT NOAH!!!"
Monday, September 29, 2008
A slow dash
I have been working the last couple of weeks, just not been posting. Sorry about that.

Then the dash and trim gets installed:
BTW, if I have the light switches in the wrong order, let me know. I forgot to document that, and the Haynes manual doesn't cover it.
Since the wiring is all in place now it's time to put the dash and lights together. So here's the dash console all scraped down with the a coast of paint.
Here's another (since it was so much work):

Then I finished wraping up the electrical:
Dials and lights next. Due to some timing issues; I'll be putting the trunk hoods on after that.
Tuesday, August 26, 2008
Back in the car.
Windshield wiper fixed and installed. It's always nice to learn new things; since this had a missing bolt and was otherwise messed with, it was nice to rebuild it.
I also finished installing the head lights.

Both of them.
Doors are next and then the dash. But I don't know if I'll install the doors; it's so easy to work on the car without them.
Both of them.
Monday, August 25, 2008
A touch of bling
Just for some color, I added some bling to the blog. I hope you like it. Rick as always did a great job on 'cleaning' up the graphics.
Saturday, August 16, 2008
Scrap and paint.
Last weekend I started stripping and painting the old parts I'm putting back in the car. A couple of good coats of rust-o-lium flat black will hopefully keep them in good shape for the years to come. The grill over the engine bay, and the rear trunk hinges.

Here's a close up of the hinges with the guide bars all attached and the mounting hardware painted black. The nuts standing out yellow just gave me the willies; so as long as I was painting today, I gave them a coat.

Here's the support arm of the windshield wipers. I'm not painting the whole assembly. And really this part was in great shape.

I found this under the car. I had to remove it to get to the breaks and gas tank lines. I was temped to send it along for blasting; but felt it might get misplaced. Since it provides a bit of aerodynamics under the car, I knew I was going to put it back on. And losing it would be unfortunate.

Here's a close up of the hinges with the guide bars all attached and the mounting hardware painted black. The nuts standing out yellow just gave me the willies; so as long as I was painting today, I gave them a coat.
Here's the support arm of the windshield wipers. I'm not painting the whole assembly. And really this part was in great shape.
I found this under the car. I had to remove it to get to the breaks and gas tank lines. I was temped to send it along for blasting; but felt it might get misplaced. Since it provides a bit of aerodynamics under the car, I knew I was going to put it back on. And losing it would be unfortunate.
Sunday, August 03, 2008
All tucked away...
There are some sub-assemblies that I'll be working on in the mean-time:
Head-lights getting put back together.
Tail lights too.
Windshield wipers need to get reinstalled.
Dash board.
The trunk hinges working correctly.
And of course the doors.
Most of these will require clean up and a coat of Rustolium before installing. So I'll blog about each one indevidually.
Parts moving back in.
I finished up the wiring harness. And put it back in.
Here's the front all taped up, and installed. The three wires dangling on the left are for the gas tank level (irionic ).
Here's the engine compartment all nice and neat. For the first time in it's life.
The middle; not so much. Still needs to be installed, but I have to get the mounting hardware for the fuse pannel.
Wednesday, July 30, 2008
Better photos though technology
Back from paint and in the garage.
You can kind of make-out the pearl effect in the paint. No hole for the signal 'puck' or antenna hole anymore.
Focusing is way over-rated. All the dings are gone; nice and smooth.
The flash is making the blue come out more than it really does.
No more rust in the engine compartment.
All patched and painted; no more holes through the car frame.
Nice and straight, and with no rust. I didn't want the jack point; and forgot to remove the one on the other side. I plan to replace the rusted 'runners' with fiberglass replacements. They will stay shinny and black.
Even the doors are nice and shinny. The grill on the engine cover should be removed and painted black (and it will be).
Best photo showing the real color and effects.
Thursday, July 24, 2008
And now a taste of things to come....
Woot Woot!! We have paint. The repair is almost complete. Here's the hood and engine cover.


Left side (which was dented) all finished up.
The Right side (which was a lighter shade of yellow) all finished up.

And just a shot of the front. Everything was so nice and shinny!
The Right side (which was a lighter shade of yellow) all finished up.
And just a shot of the front. Everything was so nice and shinny!
The trunk hood and doors have been prepped and will go in the oven tonight. Saturday for a pickup. And into the garage for putting everything back into the car.
On a side note; I got a response back that the AC24LS engine is now ready for delivery.
Subscribe to:
Posts (Atom)